Popups are an effective marketing tool when used properly and placed correctly. When creating a popup in WordPress, people often don’t think about popup placement, at least not beyond the generic home page. If you have wondered how to add popups to any page or post in WordPress, here is your answer. Learn how to create high-converting popups on pages that count using today’s best practices. Where your popup appears is important; a popup on a blog should behave and act differently from a popup on a product page. This guide could increase your popup conversion rate significantly in 2026.
Why Popup Page Placement and Popup Types Matter More Than You Think
Popups are interactive overlays that encourage engagement or conversion. If you have visited a website recently, you have probably seen one. In fact, your Cookies banner that appears at the bottom of every page is considered a popup and a legal requirement. Popup page placements matter. Your Cookie Banner will feel very different to other popup types.
A popup on a blog page could encourage newsletter sign-ups, while a popup on a checkout page can drive conversions. Each page requires customized popup content, trigger, and copy. They have different objectives; increase newsletter sign-ups, increase conversion rates, or redirect users.
Popular popup types in WordPress include:
Exit-Intent Popups (triggered when a user is about to leave)
Time-Based Popups (triggered after a certain time-delay)
Scroll-Triggered Popups (triggered when the user has scrolled X percentage)
Click-Triggered Popups (triggered on the click of a button or element)
Welcome Mats and Full-Screen Overlays (large banner on welcome screens)
Slide-ins and Notification Bars (off-center and minimalistic banners)
Explore Popup Types in WordPress and How to Use Them
Popup Examples Per Page:
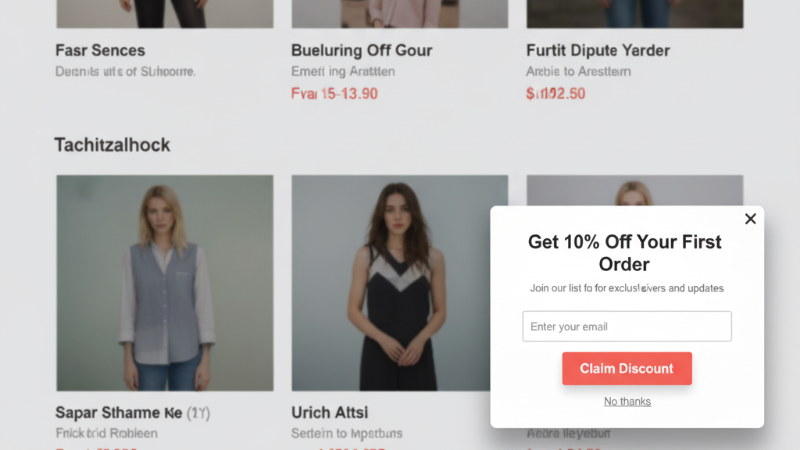
Product Page
Exit-intent discount or limited-time offer popup works well on these pages.
Trigger Type: Exit-intent (when the cursor moves toward the browser bar) or a timed delay after 30–45 seconds.
Copy: “Wait! Here’s 10% off your first order.”

Blog page:
Newsletter signup or content upgrade popup works well on these pages.
Trigger Type: Scroll depth (50–75%) works best on long-form content because it targets readers who are already engaged, not just people who landed and bounced.
Copy: “Join 10,000 others who read our content weekly, subscribe to our weekly newsletter.”
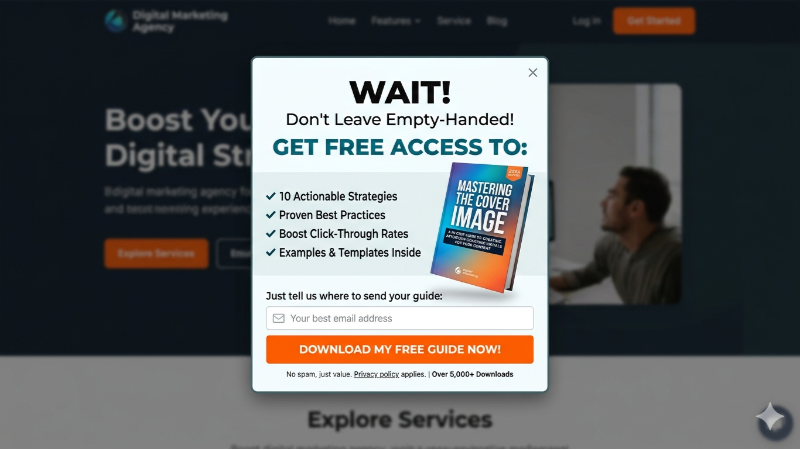
Home or Landing Page:
A simple welcome popup or lead capture popup works well on these pages, engaging every user landing on your main page. On a landing page, the popup should mirror the page’s primary CTA or highlight your product. The home page typically sees high bounce rates, so exit intent is particularly valuable, catching a user before they leave.
Trigger Type: Timed delay (8–15 seconds) or exit intent.
Copy: “Before you go, check this out.”

What You Need Before You Start
Before you begin, make sure you have admin access to a self-hosted WordPress site. You’ll also need to install a popup plugin. We recommend PopupBox, which is free to start, trusted by 50,000+ sites, and offers 70+ customization options. Plus, you don’t need any code. If you plan to collect emails, you can connect email marketing tools to your plugin; Mailchimp and ActiveCampaign both integrate directly.
The Basics: What You Need
- A WordPress site (self-hosted, not WordPress.com free tier)
- Admin access
- A popup plugin is installed (we recommend PopupBox)
- Optional: email marketing tool connected (Mailchimp, ActiveCampaign, etc.) that you will integrate with your chosen popup plugin.
A Quick Overview: The Best WordPress Popup Plugins
Today, you can create a popup without writing a single line of code with WordPress’s popup plugins. Not all popup plugins are built the same. Here’s how the most popular options stack up on the features that actually matter: they allow you to add popups to any page.
| Feature | PopupBox | OptinMonster | Popup Maker |
| Free version | Yes | No | Yes |
| Popup types | 18+ | 9+ | 5+ |
| Page-level targeting and placement | Yes | Yes | Limited |
| WooCommerce support | Yes | Yes | No |
| Ease of use | Very Easy | Easy | Medium |
How to Add Popups to Any WordPress Page (Step-by-Step)
Most WordPress popup tutorials stop at “install the plugin and publish.” The placement settings (which page, what trigger, how often) are where the real work happens and where most people see results. Here’s how to set it up properly from the start. This guide on “How to Add Popups to Any WordPress Page” will show you how you can include or exclude specific pages, post types, or categories to reach your goals.
Step 1: Install and Activate PopupBox
1. Go to your dashboard and find plugins in the left-hand column.
2. Click ” Add New ” and search for “PopupBox.”
3. Install and then activate the popup.
Step 2: Create Your First Popup
1. Create a new popup or select the popup you want to edit.
2. Choose over +18 popup type, which includes custom content, video, image, subscription, and more options.
Step 3: Configure Popup Page Placement Direction
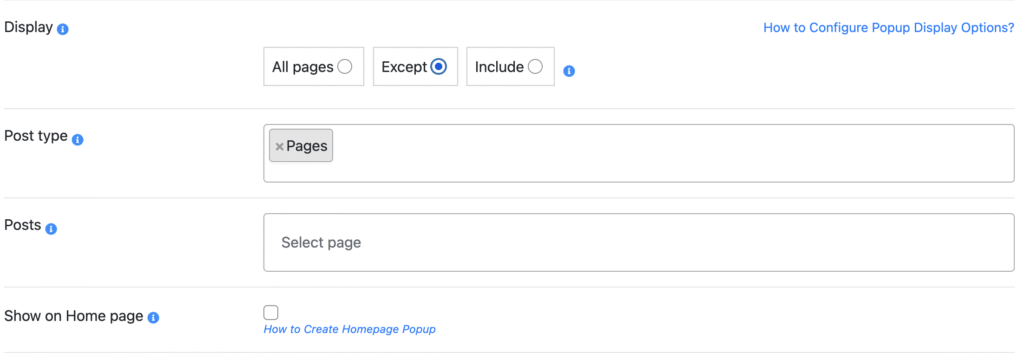
1. Go to your Settings, choose your popup page placement options.
2. Under Display, select your display rules: show your popup on the home page, all pages, or you can select to exclude and include specific pages.
For a more detailed guide on what exactly you can include and exclude, read this guide on popup display options.
Step 4: Choose Your Popup Trigger
1. Under display, choose your trigger options that match your popup page placement.
These include:
On page load
On click
Exit intent
After visiting X pages
On hover
Inactivity
Scrolling to the element
Step 5: Set Frequency and Suppression Rules

1. Go to Limitation Users.
2. Choose to display a popup once per user.
3. Choose how many times you want to display the popup per session.
4. Choose to hide the popup for certain devices.
Step 6: Save and Test
1. After choosing your display option, click Save Changes.
2. Visit your site and browse different pages to check if the popup is appearing according to your rules.
How to Add a Popup to a Specific Post or Page
When creating a popup in WordPress, you need to think past the home page. When you know how to add popups to any page or post on WordPress, you are thinking more strategically. By including and excluding pages, you can create a more seamless and targeted user experience.
How to Include and Exclude Pages
By selecting “All Pages,” your popup will appear on every page of your website. This popup display option is best for global messages, including announcements, discount banners, or cookie consent popups.
By “excluding,” you can choose every page except a few. You can exclude by: post type (blog posts), posts (specific pages), or post categories (tutorials).
The “Include option” is how you can appear only on a specific page or post. You can include posts, pages, or media. You can even select individual posts. If you have also selected the homepage, your popup will be displayed on the homepage in addition to any other pages or posts you’ve selected.
When to Include and Exclude Pages
Knowing where your popup should and shouldn’t appear is the real work. Popup page placement is all about your goals and objectives; whether you want to create popups for lead generation (emails), conversion, or important announcements.
Follow these basic guidelines for popup placements:
A single blog post for content upgrades.
All posts in a category for lead generation (e.g., trigger a newsletter popup only on “SEO” category posts).
WooCommerce product or cart pages for discount codes.
Landing pages for important announcements (show popup, hide everywhere else).
Popup Placement Best Practices That Actually Convert
Some popups need to be displayed on every page, like the Cookies banner; it is a legal requirement in Europe. Others don’t and shouldn’t be displayed on every page. For example, showing a popup for a Newsletter signup on a Checkout page will annoy your user.
Best Practices for popup page placement:
All Pages. Use for site-wide alerts or universal offers. Cookie banners, sitewide discount codes, or major announcements are the right candidates here.
Exclude important pages like Checkout, Thank You, and Contact. These pages represent users at their most decisive moment. A popup that interrupts the journey can end the journey, too.
Use Include for targeted campaigns. Showing a discount popup only on product pages, or a content upgrade only on blog posts, will always outperform the same popup running sitewide.
Match your copy to the page topic. If your page is SEO, your popup should match your language and reinforce your message. “Get our free SEO checklist” is much better than “Subscribe to our newsletter.” The closer the offer is to what the reader is already thinking or reading about, the higher the conversion rate.
Cap your display frequency. Show a popup once per session as a minimum rule. A 7-day suppression window after a user dismisses it is a reasonable baseline; nobody converts on the fifth interruption, and repeated exposure to the same popup trains users to close it on instinct.
Think mobile first. Google penalizes full-screen modals that fire as soon as someone lands on your website. Stick to timed, scroll-triggered, or exit-intent popups on mobile, and always test that the close button is easy to navigate.
Knowing the difference between popup types and website overlays will help you with popup placements.
Conclusion: Popup Page Placement Is Important
Knowing how to add popups to any page on WordPress is a game-changer. Data shows average popup conversions sitting at 11.09%, but the top 10% of sites are seeing massive results, a 42.35% conversion rate. Displaying a generic popup on your homepage isn’t going to drive that conversion rate.
Being strategic about when (what page) and how (trigger type) popups display will help drive better results in 2026. Start with one targeted campaign. Pick the page where you most need a result, match the trigger and copy to what that visitor is already thinking, and test it. That’s a better use of your time than a sitewide popup with generic copy running everywhere at once.
FAQs: How to Add Popups in WordPress
Yes, under display rules on PopupBox, you can select the “include” option to show a specific page or post. Make sure you haven’t selected the home page; otherwise, it will show on this page, too.
Depends on the goal. Exit-intent for cart recovery and lead capture; scroll-triggered (50–75%) for blog content upgrades; page load with a delay for announcements. Generally, exit-intent popups on very targeted pages (pages where users are forced to make a decision) have the highest conversion rates.
Popups and SEO aren’t mutually exclusive. Popups that are intentional, strategically placed, and optimized for mobile experiences do not affect SEO. Some of the safest popups to use in 2026 include exit-intent popups, scroll-triggered, and click-triggered popups.
Yes, each popup you create can follow a different set of display rules. These are easily created under separate campaigns for specific pages, post types, categories, or WooCommerce pages. Make sure you monitor all your active popup campaigns to ensure no overlaps between popups and for effective results.